|
Paulie shared these
wonderful Christmas crafts to
make with students. She suggests getting small boxes from a bakery to
send home all ornaments at once if you make several. She attaches this
poem (that she wrote herself) to each box lid:
Put these precious ornaments |
||
| Photos of Finished Products | Skill Level | Materials/Directions |
 |
Easy |
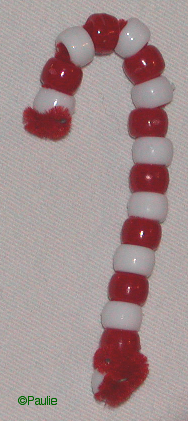
Candy Cane Need: red or white chenille stem red and white pony beads Use a red or white chenille stem and thread pony beads alternating red and white. Bend the chenille stem over end beads on both ends and bend into shape of cane. Teaches patterning ABAB. |
 |
Easy |
Angel Need: 3 small paper doilies big flat wooden spoon string beads ribbon artificial flowers Fold three paper doilies in half. Take a wooden ice cream spoon and glue string of tiny silver beads around the scoop part only. Fold one semi circle doily in thirds and wrap it around the bottom of the spoon and hanging off the bottom of the spoon for the dress and only gluing the top part.. Take the second one and do likewise but glue this one together so the bottom doily looks like the dress/skirt and this one the top of outfit. Now take the other doily and glue it straight across the back of everything just below the rounded part of the spoon so it looks like wings. Glue a small -- any color -- ribbon to the back to hang it on tree. Flip it over and add a Christmas bow and maybe some flowers to the front of the gown. |
 |
Easy |
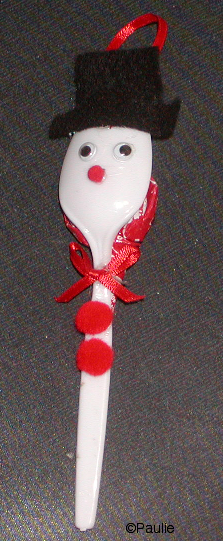
Snowman Spoon Need: Large white plastic spoon tootsie roll pop wiggle eyes ribbon pom-poms -- tiny and small Take a large white plastic spoon and glue the paper part of a wrapped tootsie roll pop into the spoon. Leave sucker inside the paper! Turn over and glue on 2 small wiggly eyes and a tiny red ball for a nose. (Could also use orange chenille stem piece for nose.) Take a 1 and half inch by 1 inch rectangle of black felt and fold in half -- have the long side going east to west when folding. Trim a small rectangle out of the side to form the hat. See photo. Before gluing it to the "front" of the spoon, put the red ribbon hanger on the top of spoon face side and glue. Then cover with the black hat holding it in place. Add a little bow on spoon and a couple bigger pompoms for buttons -- any color would be ok for these. The child can eat the sucker before saving for next year's tree. It looks cute without the sucker in back. Just gives added weight. Could add a new sucker every year. |
 |
Easy |
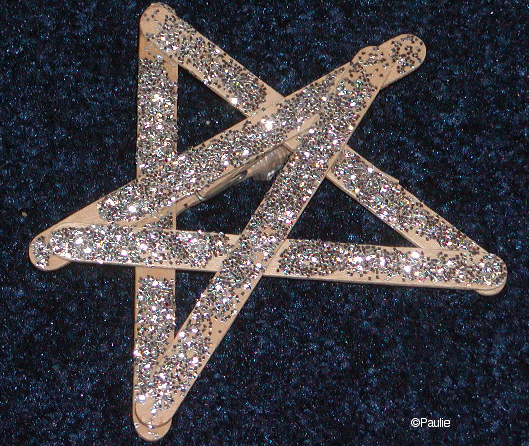
Star Need: popsicle sticks glitter small mini clothespin Look at photo and glue popsicle sticks together in same fashion. Hot glue a mini clothespin to the back to clip onto tree. Could also use craft glue for clothespin if this is finished in more than one day. Cover with lots of glue -- Elmer's is fine --on front side only. Sprinkle with glitter. Shake off and let dry. If it doesn't get perfectly covered, it still looks nice on the tree. |
 |
Easy |
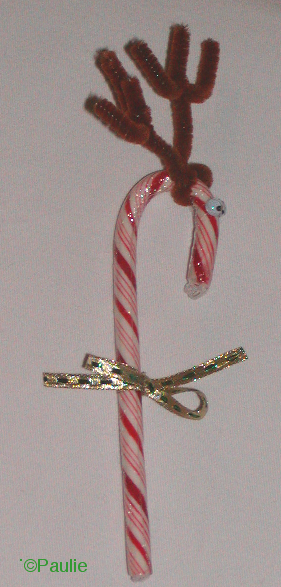
Reindeer Candy Cane Need: candy cane brown chenille stem moveable eyes ribbon Take a candy cane -- any size and any color. Take one brown chenille stem-- cut to size appropriate to the candy cane you are using and twist a small part of another chenille stem to it to form the two antlers -- one on each end of the chenille stem You will have to play with this because the size of antlers depends on size of candy cane used. Wrap around candy cane near the top "hook" for antlers. Add wiggle eyes to sides below the antlers and also a bow around the neck |
 |
Harder |
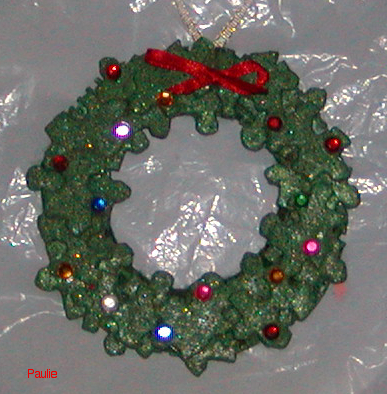
Wreath Need: puzzle pieces "o" shape lightweight cardboard green paint glitter ribbon sparkly gems Perhaps you don't know what to do with a jigsaw puzzle once you lose a piece? Just the right solution. . . an oldie but goodie. Start with a die cut lower case "o" out of thin cardboard. Glue a gold ribbon on top of the cardboard in top position. Glue jigsaw pieces around the circle (covering the ends of the ribbon) in three layers, alternating to cover the background cardboard. Spray paint front and back. Sprinkle with glitter. Hang to dry with ribbon hook you glued beneath the puzzle pieces -- refer to photo. You could also dry on waxed paper on flat surface. When green paint is dry, add a few gems or shiny pieces and a red bow. Where you place the bow is optional -- looks good on the left side also. Put it on before the gems. |
 |
Harder |
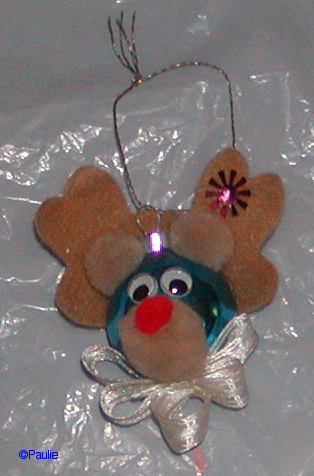
Rudolph Xmas Ball Reindeer Need: small amount of tan felt 1 small Christmas ball -- almost any color 2 brown pom-pom balls for ears and one bigger one for under nose inch wide Christmas ribbon -- about a foot -- experiment. 2 big wiggle eyes 1 small red pom-pom ball for nose fancy string/crochet thread for hanger Look at photo and see where to glue the two ears on first -- on either side of the metal on top of Xmas ball. Make a little pattern for the antlers -- looks like two tall fingers and one short finger on either side of that. It doesn't have to be perfect. . . refer to photo. Put the looped crochet thread tied onto the loop of ball hanger. Glue antlers on the back of Xmas ball overlapping in back-- o so slightly --and to the back of the two ball ears and over the hanging loop. If you want, add a fancy sequin to one antler -- any color. Add eyes. Just below the eyes, glue the bigger brown pom-pom and then the little red one on top of that. To make the bow, glue the two ends together to form a big circle. Lie flat and pull together in another row of loops and then make a small loop on the top, each time gluing down. THEN, add it to bottom of ornament under the nose. You could also cut the ribbon and make the three "loops" referring to the photo. |
 |
Harder |
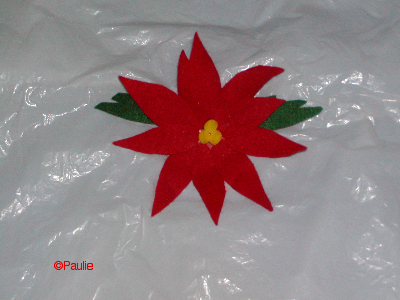
Poinsettia Need: 1 wooden clip clothespin green paint and brush red and green felt 3 yellow pom-poms craft glue Paint large wooden clip clothespin green the day before so it can dry. Make 10-12 elongated teardrop shape leaves in red felt about 3 inches long. Make two green leaves same way as poinsettia but cut a few "v" snips out of one side only. (See photo) Glue one to each end of clothespin BUT hanging over the ends of wood. Best to put glue on the clothespin and place the felt on top of that. Glue the petals (red) on in a continuous circle slightly overlapping. Leave small gap of clothespin in a tiny circle as placing the poinsettia leaves. Add three small yellow pom-poms to center. Clip on tree. Name can be on back of clothespin with Sharpie. |
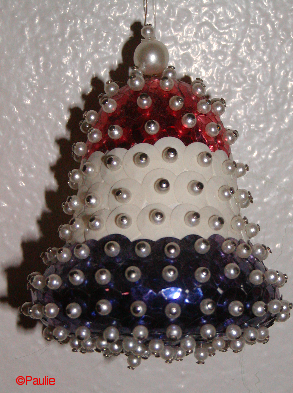 |
Harder |
Bell Need: Styrofoam bell shape lots of sequins, seed beads and short straight pins in the theme color you choose one hat pin with the white teardrop "pearl" one large round pearl bead. To attach the decorations, thread on a short straight pin first the small bead and then the sequin and stick in place, covering bell. See sample. Cover bottom first and go up. On the very top add a little pearl, the big pearl and a sequin to the pin and stick in the top.. Tie the string to hang it on the top tiny pearl. Refer to photo. HINT: If you dip the end of the pin into glue before you stick it in, it will hold everything on better. Add a temporary "name" with a small sticker to the bottom or back. |
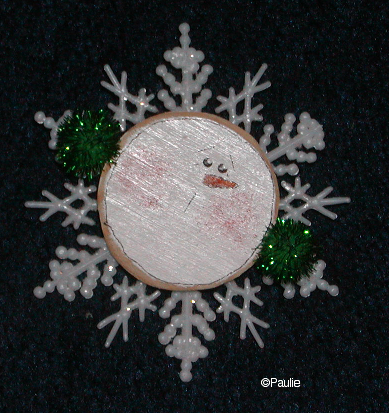 |
Harder |
Snowflake Snowman Face |
|
Search for additional Christmas crafts: |
||